
Thank you! Your comment has been submitted successfully. You should be able to view your question/comment here within a few days.
Error submitting comment. Please try again momentarily.


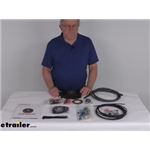
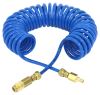
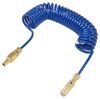
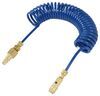
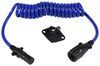
Use your Demco Air Force One supplemental braking system on a second towed vehicle with this kit. Includes all the components needed to install on the vehicle side with no extras.
Features:
California residents: click here
Videos are provided as a guide only. Refer to manufacturer installation instructions and specs for complete information.
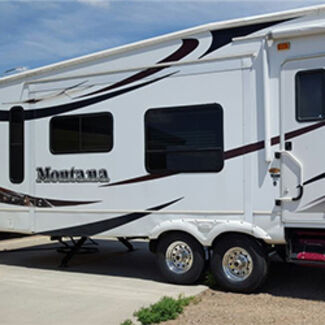
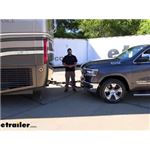
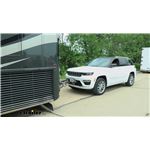
Hello neighbors. It's Brad here at etrailer. And today, we're taking a look at the Demco Air Force One supplemental breaking system. Now, this is gonna be the second vehicle kit. And what that means is it doesn't actually come with the compressor tank that needs to be installed on the RV. Reason being some of the newer Freightliners and newer models of RVs actually have those tanks ready to go with the brake sync hookup quick-connect already onto it.
So, there was no need for the entire kit. Now, if your RV does need that tank, you're gonna wanna pick up the entire Air Force One kit to make sure that you have all those components, so that it actually works. Now, when you're setting a vehicle up for flat towing, there's gonna be five required components in able to do this and the first one being the base plate. So, that's where we can actually make that connection point between the vehicle and the tow bar. The tow bar is gonna be the connection point between that base plate and the actual RV's hitch.
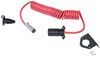
Now, you'll also have your supplemental braking system and this is required in all states. And so, that's gonna be our breakaway switch. And in this instance, since it's air brakes, also our air line. You also have your diode wiring, which is gonna allow you to send those signals from your camper to your vehicle as you're driving, letting people know what you're actually doing. You also have your safety chains.
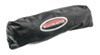
And so, in case of an accidental disconnect, you actually have those chains to hold onto that vehicle. Now, keep in mind, our Roadmaster Nighthawk here actually came with our safety chains. Not all of them do, so make sure you pick up a set of those if your tow bar doesn't have those already. But with all of those components, you're gonna be able to tow your vehicle safely and legally. Now, with all of this exposed, something that's optional that you can add on is gonna be something like this Roadmaster tow Guardian that's actually gonna create a nice, covered sheet here to prevent the vehicle from getting any rock chips or road debris while being towed.
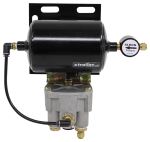
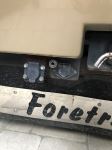
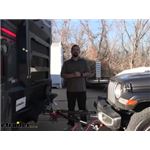
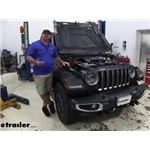
Now, something else you might consider adding on to your flat tow setup is gonna be a charge line. And the charge line simply goes to your six-pole and it allows the vehicle or the camper to send electricity to this circuit breaker here, which is going to be able to charge our battery as we're towing. So that way, when you get to the campsite or wherever your final destination is, you're not having to jump your vehicle. It's actually charging while driving. Now, you can see our Air Force One unit is actually living under the hood here and you do have quite a few connections as it's gonna run to our breakaway switch in the front, allowing the vehicle to come to a stop if the vehicle was to accidentally disconnect. You also have vacuum lines, and your air in and air out. So, that's gonna be the supplied air from our RV. And this air out is also going to tie into our vehicle to our piston, allowing that brake pedal to actually compress. Now, our vacuum line here is attached to our brake master cylinder, and you do have to split in to get that tied into place but it's not too scary to do and I'm gonna show you how to do that. So, here we actually have our cylinder mounted up on our brake pedal. And so, with a nice bracket, it allows it to tighten up and it has a cable that actually is attached to the firewall. So, when the vehicle actually sends that air pressure through those brakes to the towed vehicle, it will actually actuate it as you actually press in the RV. Now, the great part is it is proportional, meaning as much pressure that you put on the pedal in the vehicle, you're also gonna get that in your towed vehicle, so that's pretty great. It's not an all or none thing. And also, something that's great about this is it also works with that breakaway switch. So, if the vehicle was to disconnect, it'll pull that cable and the brakes will be applied. Another component in the kit that I really like is the actual coach link itself. And so, sometimes you'll have a light that comes on when you brake on other vehicles but you have to run that wire all the way up. Well, the great part about this coach link is it's actually wireless as the module lives inside the vehicle and sends the signal to this box here right at the driver's compartment. So, when I apply the brakes, you can see those lights come on, letting me know that the actual towed vehicle is braking at the same time. Now, as I said earlier, another great feature is the breakaway cable here. So, when I actually pull this, that's gonna put that brake pedal on, bringing that vehicle to a stop in case of an accidental disconnect. That way, you don't have a vehicle rolling down the highway if it does become disconnected. So, this is a required portion of flat towing as you do need a supplemental braking system. And that's just gonna give you that added safety and also, for the safety of others on the road. Now, as far as the installation goes on the Air Force One, there's a few components that you're gonna have to tie in that kind of bounce around through the vehicle a little bit. So, you'll be on the inside as well as routing some stuff, but overall, it's really not too bad to do. You should be able to do it and I'm gonna walk you through all those stuff to make sure that you can do it. So, let's take a look at that now. We're gonna go ahead and show you some of the main components of the Air Force One braking system. And it's a pretty simple system. Really it comes down to just a few components that all kind of tie together via a wiring throughout the vehicle. So, starting at the front here, you're gonna see you have your breakaway switch. And this breakaway switch, as the name implies, if the car was to break away, it's gonna pull this pin and that's gonna put the brakes on the vehicle. Now, pretty simple. We have two wires that come off of this, an orange and a black. And so, I simply ran those up to make connections up top. Now, we also have an air line here. And this is actually gonna connect to a quick-connect on our RV, and that's gonna allow us to actually have the air pressure from those air brakes be sent to our vehicle. So, I've just gone ahead and tied these down underneath the bumper and then routed them up and let's check up there. So, our air line and black and orange wires simply run up. Now, you can see I've kind of tucked them along here and I've used wire loom just to kind of clean it up. Our orange wire is in here and that's gonna be running to our positive battery terminal, and that's gonna actually give us the power to actually send the signal to our box here. So with that, there's also gonna be an inline fuse with a 10 amp fuse that you'll put in and connect to your positive battery terminal. So, that's our orange wire. Our black wire is actually running to one of the wires that's on our box. And you have two black wires that come off of here. It doesn't matter which one you use. You can grab either one and make that connection. Now, we also have our air line that we ran from that quick-connect fitting and you can see I routed it here. That's gonna go to air in on our box. Now, looking at the other things that we have on our box, there's gonna be the one other black wire. We have our air out as well as our vacuum. So, let's take a look at where those go. So, the other black wire I've simply just ran down here, and there's a nice factory ground that I just put a ring terminal on there and grounded that down. So, that leaves us with our air out and our vacuum line here. And so, we can actually trace both of these. I've run them across. And you can see our large vacuum line I zip tied, kind of follows along this area, but behind here there's a plastic panel. It actually has clips along the way that holds a lot of the factory wire bundle. I was able to fit my air out as well as some of our reed switch wires, which we'll see inside, through here. And that just made it nice and easy to channel. So, let's follow these over. So, in a large vacuum line here, you can see I put a one way check valve and that just allows air to go one way and not the other. And that way, it's not gonna mess with our air pressure when this calls for braking. Now, this simply goes into a T that we cut, this actual booster line that feeds to the engine. And you can see we use the hose to go over this factory one with some hose clamps to clamp that down. There's also another one way check valve. And then we also clamped it down on this area as well. So, we still have our factory line going to the brake booster. We just kind of made an interruption here with our T. That way, it's able to pull whenever it needs to. And our one way check valves are gonna prevent it from causing any issues with the engine. So, the air out is the other one we need to find and that is simply run through here. And you can see right here, I have my air line and then I also have a white and a brown. So, those will feed through a grommet. There's a plastic grommet on the Jeep that you can actually twist and it's a nice plastic one. It's a little bit easier than running through a rubber grommet, and I just drilled the hole through it and ran my line. So, let's hop inside and I'll show you what we got going on there. So, there is kind of a mess of wires in here and I did have to extend a few just to make sure that it ran all the way to where we needed. But really, the only things that are going outside of the firewall are gonna be the air line, our brown wire, as well as our white wire. The brown wire that feeds out of the firewall and eventually just ties into 12 volt power. So, I actually ran that all the way back right before where our fuse holder was and tied into that. Now, the reed switch also has two other wires coming off of that, which are gonna be a black and a blue. Now, our black wire is going to attach to a red wire on our coach link. And our coach link is gonna send wireless signals to the RV while towing to let us know that the vehicle's actually braking. And also, off that coach link, you're gonna have a black wire. And that black wire is gonna go to our blue wire on the reed switch, which is really just a ground. So overall, it looks like a lot of wires here but you want your brown to be running to power. You're gonna attach your black wire on the reed switch to the red on the coach link. The black on the coach link will then go to blue wire or the ground wire on the reed switch. The coach link has that long gray wire. I've gone ahead and zip tied a bunch of it up. But off of that, you should have a red and a black. Now, those are gonna be pretty simple as the red wire's going to attach to the black wire coming off of the reed switch, and then the black wire is going to attach to the blue wire off the reed switch and that's just gonna go to a ground. So, you can choose the factory ground or you can actually attach it all to one wire and run that to a factory ground elsewhere in the vehicle. It's kind of up to you. And that's exactly what I've done here is my blue and black wires I simply attached together with a butt connector to a longer run of white wire, and I've fed that out to a factory ground. And that way, I can keep all my grounds kind of in the same location on the vehicle. So, it's really up to you. Just make sure that you do have it grounded. And that's where our white wire that goes to the firewall lives. That's gonna be our ground. So, then the only other two that we have poking out we're that brown wire from the reed switch going to the power, as well as that air line that's gonna feed to our module box. So, the air line that we ran through, you can see connects to our cylinder. And this is really what is doing the pulling of that brake pedal to slow the vehicle down. And really that's gonna be done by that signal being sent and air pressure from the RV to this. And as that actually gets triggered, it's going to pull our pedal towards that, you can see, attachment point there that we've put in with some self-tapping screws, allowing the vehicle to proportionally brake. So, the best thing you can do to test this system is hook it up to your RV with your air connection, your breakaway switch, as well as your umbilical, and you can actually build up pressure in the RV. Now, have someone in the driver's seat of the RV actually press on the brakes while you're in the vehicle just to see if you can have that pedal actually actuate. You can also pull the breakaway switch to make sure that it's actually going down. And the person inside the RV should check to make sure that the coach link is also indicating that it's braking as well. Now of course, you're gonna wanna be doing this all while the RV is actually stationary. But once you do that check, then you'll know that you're breaking system's working and then you can hit the road. And that was a look and installation of the Demco Air Force One supplemental braking system. This is the second vehicle kit on a 2022 Jeep Wrangler Unlimited..

Easy to install, works great on my 2023 Jeep Gladiator, pulling it with my 2005 American Tradition 40L Class A motorhome!

Already had the Air Force one hardware on our Tiffin so it made sense and works great. Super easy to hook up and unhook.
The braking system works great applying the brakes with the same force as how hard you press in the RV, I would have given it a 5 star, but the adjustment for the indicator light is sticking, I looks like the bolts they give you are scraping on the cylinder so it does not shut off as it should, I have messed with adjusting for over an hour and it sticks. Prior to hookup with air it looked like it would work perfect , but once I hooked up air it started to stick
I ordered the second vehicle kit Air Force One because the coach is already equipped with AFO components. It was very well packed all items were sent. The shipping was right on time. I decided to perform the install myself and along with the instruction videos it was not as bad as I had imagined. A couple of suggestions, on the videos they talk about using weatherproof connectors that aren’t in the kit so had to go purchase them. I did not see any one cutting into the vacuum hoses and making those connections or installing the cable to the firewall of the Jeep. That was the biggest challenge due to no room to move or position the plate and anchor. All in all I would do it again. The install estimate was $2000 at a dealer and I felt I could do it myself after watching the videos. At this time I have not gotten to test the system but plan to shortly.
Installed easy enough. Used an idea from Demco website to mount the main operation unit on top of the fuse box next to the battery on my 2021 F150. The etrailer videos were very helpful with the rest of the install. The air connection was install thru the license plate hold. The design of the bumper on this truck did not really provide a good option for installation so I attached to the side of the base plate.
They do a great job of including everything. I know they can't cover everything but the firewall on my 2025 Jeep Grand Cherokee L Summit Reserve is very thin. They give you a plate to mount in this situation, but there is no way to fasten it down as there is no access behind to use nut and bolt, and the self drilling screws are the same as used to mount the cable connection. Ideally, they come up with different fasteners that may work better, like those used on overhead garage doors.
Installed the Air Force One (AF1) in a 2017 Wrangler Rubicon. This replaced a RoadMaster Even Brake system. Love that the AF1 is so small and completely out of the way. Love that we don't have to cart the brake controller in and out every time we hook up and disconnect. It's so much easier just attaching one air hose and away you go.
I created a mounting plate from 3/16" aluminum plate and mounted it under the hood. (See pictures). Installation was pretty simple. Just make sure you take your time to align the cable correctly from the pneumatic control. I would also recommend using a through bolt through the Jeep firewall with fender washers as the firewall is pretty flimsy and I was worried the provided sheet metal screw wouldn't hold. It took a couple of test runs to get the cable adjusted properly but I haven't touched it since then. We've done 50 or more hookups and disconnects since initial installation and everything has been flawless. Would definitely buy this system again.
I installed this in my second flat tow vehicle (dinghy) a 2024 GMC Sierra Denali 1500. I added a small aluminum angle iron bolted to the unit to facilitate mounting inside the front passenger side quarter panel. Easy to remove if needed for servicing but out of the way. I installed the air connection behind the front license plate and drilled a hole through the plastic. This will be covered with a flip-up license plate frame. The safety brake away was mounted to the outside of the driver side tow bracket with a small spacer between the unit and the bracket with a longer bolt. This allowed the routing of the brake away cable through the factory plastic hole. I remove the factory plastic cover when towing. Easy to access but invisible when daily driving. I plan to add a 90 degree fitting to ease the air connection process behind the license plate. My aim was easy to connect with a factory look while daily driving.
No video installation instructions for my exact vehicle but etrailer was very helpful with determining a mounting location for the controller. The video was very helpful with the installation of the rest of the components. When I completed the installation, the braking system worked as intended.
The installation was a one man afternoon project. Since the installation, we have towed our GMC Sierra to Florida and back as well as several more localized trips. The Air Force One system has greatly improved braking .
We decided to step up and buy the Air Force One braking system from etrailer, they had the best price and all the parts in stock which was great, we received the items a few days later. The instructions and [online] video allowed me to install the system quickly, there was no need to chase parts as everything was included. It was a pleasure to quickly talk with a knowledge customer service agent who verified the system figment.
Excelant braking system, no fuss no worry. It just works!

Wayne

6/25/2024
Excellent! It does it’s job with no intervention on my part. I’ve towed three cars with BlueOx & Airforce1s for a total of about 20,000 miles without an issue of any kind.
Works perfect and the installation was awesome
Arrived in a timely manner. All parts labeled and easily identifiable and install wasn’t straight forward. Only recommendation would be to add weatherproof electrical connections
It look like an great system to install.
easy to install. great system.. Have not had any issues with it and we are full time on the road.
First of all, etrailer was very quick t ship our Air Force One braking system.
This is a great system. We also have a Ford Explorer that we have been towing for 6 years with Air Force One. When we added our Chevrolet Silverado to the stable, I considered buying a standalone braking system. But after some further thoughts and especially the fact that all I have to do is hook up the air hose and we are ready to go, it seemed only logical to install another Air Force One. Since our Silverado is gas powered, I tie strapped the Air Force One box to the battery location for a diesel truck since it was an empty spot.

Stu
7/5/2024
It is hard to believe that it has been a year since I installed this. I have not done anything to it since installation other than adjusting the brake pedal cable just a bit. I had it a little too tight short initially, causing more brakes than needed out of the Silverado.
Have not installed it yet the customer service getting order and follow up has been great
Thank you
If your coach has air brakes, the Air Force One system is the only way to go. No fiddling with it, no adjustments to make and absolutely no problems. It just WORKS! Installation is not difficult. Take your time, read ALL the instructions and pay attention to the details. I installed mine at the same time as I installed the Blue Ox tow bar kit on my Yukon. Once the whole front end is accessible, installation is pretty straightforward. It took me about about two half- days to install both. A lot of fiddling around taking all the plastic trim pieces apart and putting them back together again but once it was done the truck looks the same as it did. You cannot even tell the AF1 system is in place.
Steven
6/18/2022
What more can I say? It just WORKS! Plug in the air line, connect the lighting cable and breakaway switch tether and you’re done. What could be simpler? There is one installation quirk I will mention: if your toad has adjustable foot pedals, set them where you normally do and then pull the fuse for the actuator. The AF1 air cylinder can only be adjusted for a fixed pedal distance. Moving the pedals in or out after installing the air cylinder will result in either insufficient pull on the brake pedal or too much pull, resulting in a continuous dragging of the toad brakes. We never moved the pedals anyway so it was a non-issue for us, but something to be aware of if your toad has that feature.
Works great
I installed this SMI Air Force One braking System on a 2017 Jeep Wrangler Sahara Unlimited. I watched and then followed the etrailer video. It was an easy install and the video was spot on. My coach already had the air tank installed, so I just had to buy the Second Vehicle Kit and the Air Jumper.

F. B.
7/18/2019
Ive put 11,000 miles on this towing set-up in the last year. Still loving it.
Fair price for the Air Force One unit for a second vehicle.

Bob
8/8/2024
Working great
I highly recommend this kit. I would highly recommend this kit. Remember that this is only for the towed vehicle and doesn't include the motor home parts. I installed it on a diesel F 250 and it is very tight under the hood, so I installed the control box vertical, with wire ties behind the grill and it works perfect. I could not find any space under the hood that would be out of the way of future engine repairs. The kit is easy to install and the instructions are good. Just read the instructions and do a step at the time.
Vance
12/30/2022
This is by far the easiest brake system to use. Having got a new vehicle, this is the second vehicle that I have put this system on. It has been working very well one year later.
Simple kit to install except for working under the pedal area.
Much care is needed on how you get and seal penetrations in the firewall.
We bought a Motorhome that had this braking system installed but we did not get the parts from the towed vehicle. This second vehicle kit was perfect for that. Etrailer had the best price and it was delivered fast. I will continue to use Etrailer.
William M.
8/18/2021
A year later this product is working perfeckly!
Do you have a question about this Accessories and Part?
Info for this part was:
At etrailer we provide the best information available about the products we sell. We take the quality of our information seriously so that you can get the right part the first time. Let us know if anything is missing or if you have any questions.


Greg
2/24/2025
The only complaint I have is that the instructions stated to only tighten the nuts on the cylinder mounting to the brake arm finger tight. I tightened a bit more but still found myself struggling under the dash on my second trip with a leatherman re-adjusting and tightening the nuts as they had come loose. I would suggest you tighten those nuts to where youre satisfied they cant back off so you dont end up re-mounting as I did on the road. Otherwise Im very happy with the way the system functions. Very quick and easy to hook the Jeep to the RV. It was worth the installation hassle to have a worry free and easy hook-up every time we travel.